Google Search Console (GSC) is a powerful tool provided by the search giant to monitor your website’s performance. Setting up GSC is critical to your website’s success and can improve your SEO efforts.
By using Google Search Console, you can access valuable data that is directly from Google. This data can be used to identify areas where your website needs improvement, direct your SEO efforts, and capitalize on areas where you’re already excelling.
This guide will provide a step-by-step walkthrough on how to add Google Search Console to your website and how to leverage its features to discover site performance opportunities. By following these steps, you can increase your chances of ranking higher in search results and attracting more traffic to your website.
Think of Google Search Console as a powerful tool that enables communication between you and Google. By utilizing this tool, you can take your website’s SEO efforts to the next level and achieve greater success online.
Google Search Console vs Google Analytics
Google Search Console and Google Analytics are two powerful marketing tools for data-savvy website owners. Although both tools are owned by Google, they serve different purposes.
Google Search Console is primarily used to monitor your website’s performance in search engine results. With this tool, you can track the performance of your website’s pages, identify and fix technical issues that may affect your site’s search engine visibility, and optimize your website’s content for better rankings.
On the other hand, Google Analytics provides valuable insights into your website’s users. This tool allows you to learn more about who your users are, how they found your website, and how they interact with your website’s pages. Additionally, Google Analytics extends beyond your website and provides insights into the performance of your ads and social media channels.
Despite their similarities, Google Search Console and Google Analytics serve different functions and are not interchangeable. By leveraging both tools, you can gain a deeper understanding of your website’s performance and make data-driven decisions to improve your online presence.
How to set up Google Search Console
Setting up Google Search Console is a crucial step for website owners who want to monitor and improve their website’s performance in search results. Here’s a step-by-step guide on how to set up Google Search Console:
- Log in to Google Search Console Go to Google Search Console and sign in using your Google account credentials.
- Choose between domain or URL path Google Search Console will prompt you to choose between setting up Search Console for your entire domain or a specific URL path.
- Enter your domain or URL path If you want to track the performance of all the pages on your website, including mobile and HTTPS versions and subdomains, select the option to set up Search Console for your entire domain. If you’d instead set up Search Console for a specific URL path, follow the steps in the next section.
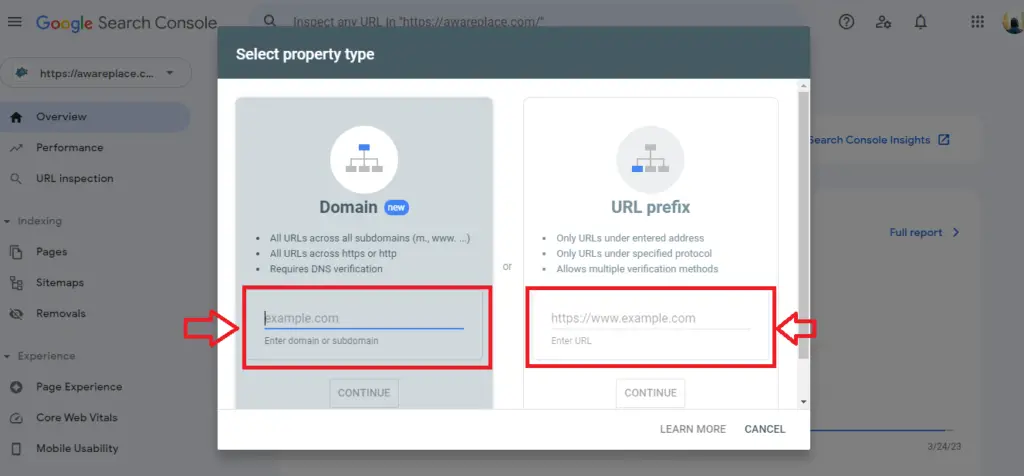
To proceed with a Google Search Console setup for your entire website, select the left panel and enter your domain or subdomain without the HTTPS prefix. For example, if your domain is “example.com”, enter “example.com” in the text box.
Once you’ve entered your domain or URL path and clicked “continue” to set up Google Search Console, the next step is to verify ownership of the domain or URL path you entered.
How to Verify your domain
Here’s how to do it:
1- Verifying GSC for a domain-level property

Verify your domain To activate your Google Search Console account, you’ll need to verify ownership of the domain or URL path you entered in the previous step. GSC provides several options for verification, depending on which property type you entered.
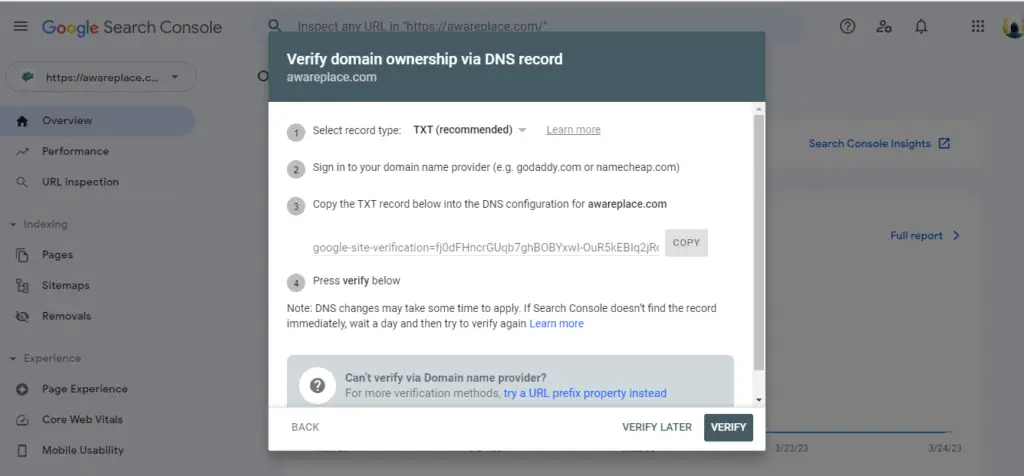
Verifying a domain-level property in GSC If you’ve chosen to attach a domain property, you can only verify it using the TXT or CNAME record type from your DNS records provided by your domain provider.
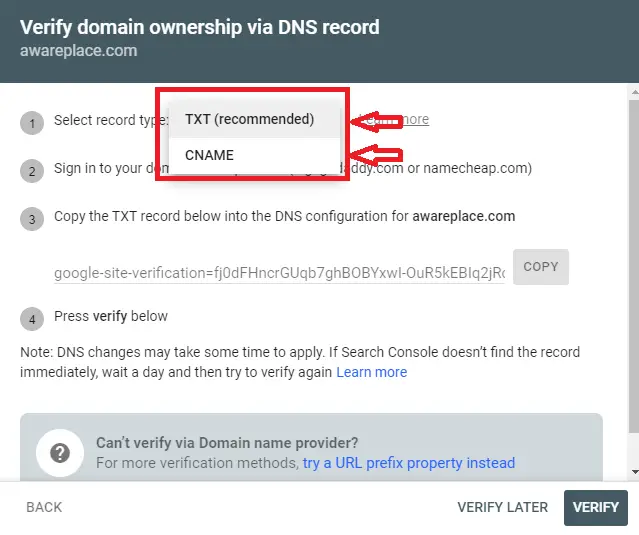
Select the TXT record type and follow the instructions to sign into your domain name provider in a new window.
Once you’re in your domain’s DNS settings, click to add a new DNS record. Choose TXT under the “Type” field, and enter “@” under the “Host/Name” field with a TTL set to auto or 1 hour. For example, here’s what adding a new TXT record in my DNS settings looks like. Make sure to add the TXT record provided by GSC in the “Value/Content” field.

By following these steps, you’ll have successfully verified your domain in Google Search Console and can begin using its tools to monitor your website’s performance, improve your SEO, and drive more traffic to your site.
2- Verifying GSC for a URL prefix property
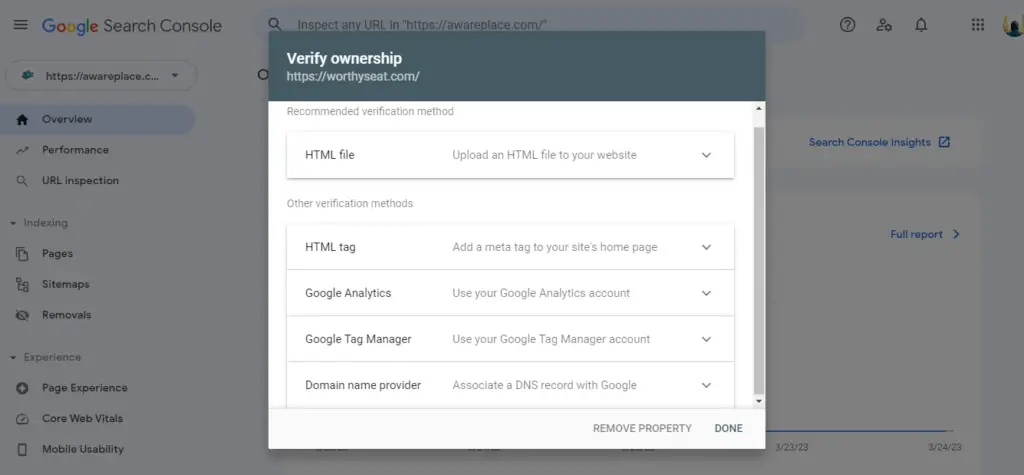
When setting up Google Search Console for a URL prefix, you can verify ownership through five different methods. These include uploading an HTML file, adding a meta tag, using Google Analytics, associating DNS records in your domain name provider, or verifying through Google Tag Manager. Let’s take a closer look at each option.
1- HTML file
For the HTML file verification method, you’ll need to have access to your website’s server via FTP or a cPanel File Manager. If you’re not familiar with these tools, it’s best to use a different verification process.
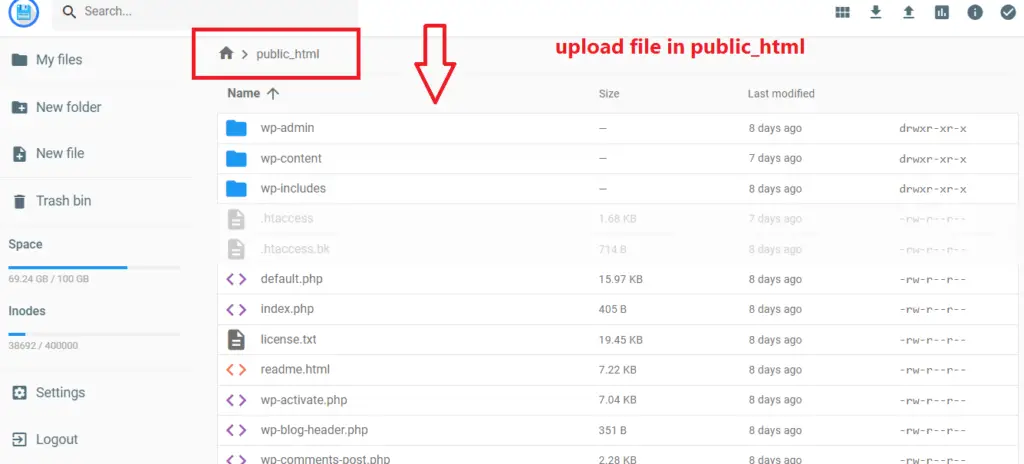
To begin the verification process, select the HTML file option in GSC and follow the provided instructions. Download the file and upload it to your root directory (public_html) using a tool like Cyberduck or through cPanel.
Once the file is uploaded, return to GSC and click the Verify button to complete the process.
2- HTML tag
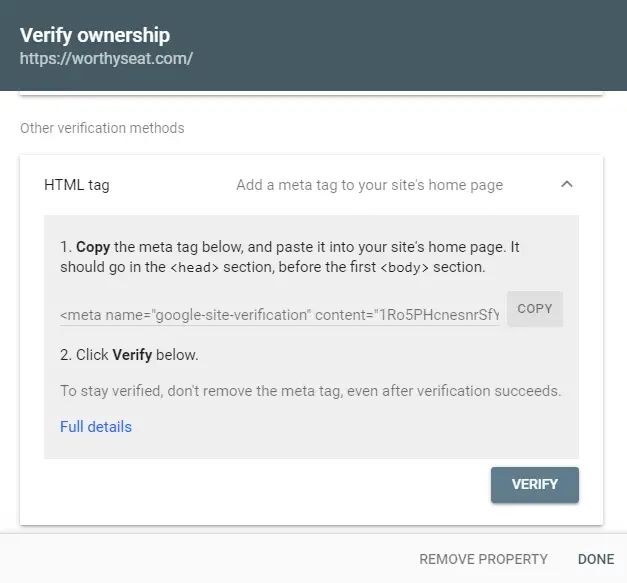
This method requires adding a meta tag provided by Google Search Console to your website’s homepage HTML code. This method is relatively simple, and it doesn’t require server access.
When verifying a URL prefix property in Google Search Console, one of the available methods is using an HTML tag.
The HTML tag verification method involves adding a unique meta tag to the head section of your website’s homepage HTML code. The meta tag includes a verification code provided by Google Search Console. Once the meta tag is added to your website, Google can detect it during the verification process and confirm that you are the owner of the website.
Here are the steps to verify a URL prefix property in Google Search Console using the HTML tag method:
- Log in to Google Search Console and select the URL prefix property you want to verify.
- Click on the “Alternate methods” tab and select “HTML tag” from the list.
- Copy the meta tag provided by Google.
- Paste the meta tag into the head section of your website’s homepage HTML code, between the <head> and </head> tags.
- Save the changes to your website’s HTML code and publish the updated page.
- Go back to Google Search Console and click the “Verify” button.
Google will then check for the presence of the meta tag on your website’s homepage, and if it detects it, it will verify the URL prefix property for your Google Search Console account.
2-1- How to add HTML tag in wordpress
Verifying a URL prefix property in Google Search Console for WordPress websites can be done easily by using a WordPress plugin like Surfer. This is especially recommended for users who do not have a child theme set up, as changing or updating their theme could remove the HTML tag they just inserted.
To use Surfer, simply install the plugin from your WordPress dashboard and navigate to its settings. Paste the HTML tag generated by GSC into the designated field and save the changes.
Alternatively, users can manually insert the meta tag into their website’s HTML by accessing the page’s code. To do this, log in to your WordPress dashboard and navigate to Appearance > Editor. From there, select your current theme and find header.php in the drop-down menu.
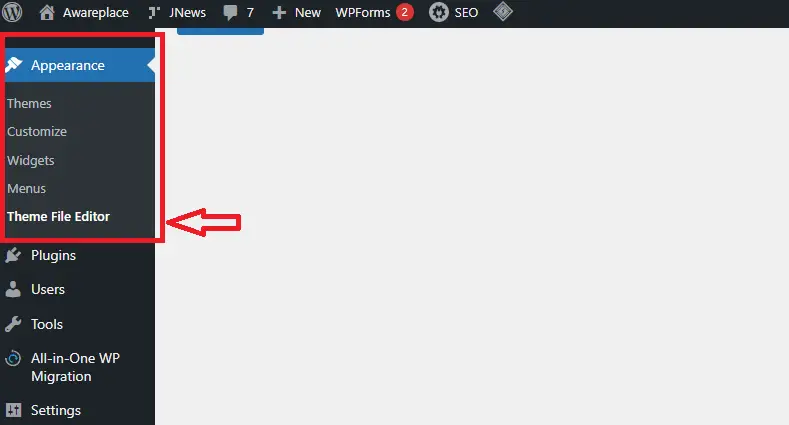
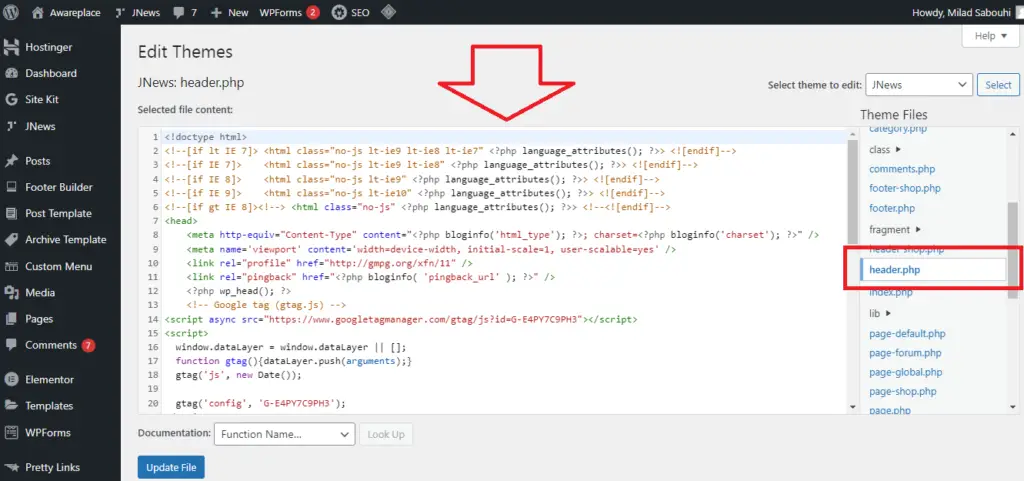
Paste the meta tag into the section and save the changes. Once done, head back to GSC and click Verify.
3- Google Analytics tracking code
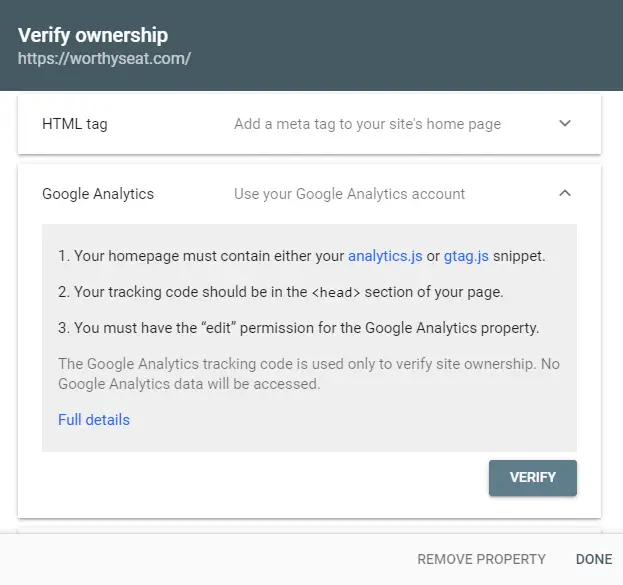
If you have already added a Google Analytics tracking code to your website, you can easily verify your website in Google Search Console by clicking on the Verify button, and you should be automatically verified. However, if you haven’t installed a tracking code yet, you may need to select another verification method or first add the tracking code to your domain. It’s worth noting that having Google Analytics set up on your website can provide valuable insights into your website’s performance, including traffic sources, user behavior, and more.
4- Google Tag Manager
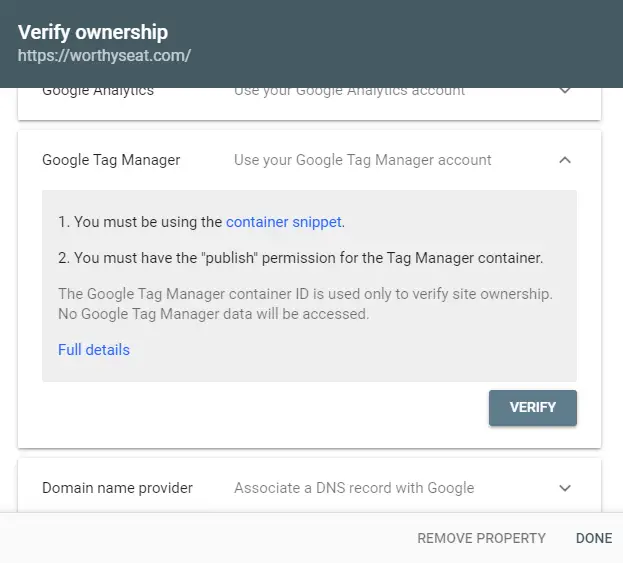
If you are already using Google Tag Manager to manage your website’s tracking codes, you can use this method to verify your Google Search Console. This option is only available if you are an administrator for both Google Search Console and Google Tag Manager accounts.
5- Domain name provider
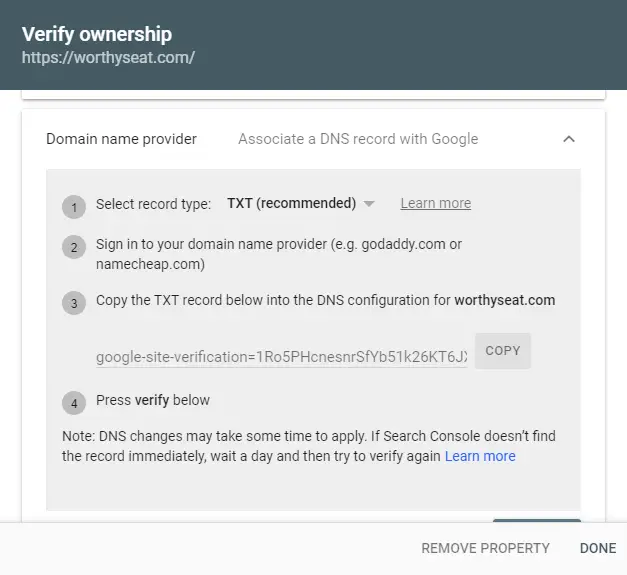
To use this verification method, select the “Domain name provider” option in the verification page of Google Search Console. Then, click the link that says “Verify using a domain name provider” and follow the instructions provided by Google.
Essentially, you’ll need to log in to your domain name provider’s account, access the DNS settings for your domain, and add a TXT record or a CNAME record as specified by Google. Once you’ve added the record, go back to Google Search Console and click the “Verify” button to complete the process.
Note that the exact steps may vary depending on your domain name provider, but Google provides detailed instructions for many popular providers. This method is usually the easiest and most straightforward way to verify your website in Google Search Console when using a URL prefix.
How to submit a sitemap to Google Search Console
Submitting an XML sitemap to Google Search Console (GSC) is a crucial step after verifying your domain property. This allows Google to effectively crawl your website and display it in search results, making it easier for potential visitors to find you. By submitting an XML sitemap, you can ensure that all your website’s pages and content are indexed, improving your chances of higher rankings and more visibility.
What is an XML sitemap? and How to create an XML sitemap for your website?
To create an XML sitemap for your website, you can follow these steps:
- Use a sitemap generator tool: There are many free and paid tools available online that can help you generate an XML sitemap for your website. Some of the popular ones include Yoast SEO, Screaming Frog, and Google’s own XML Sitemap Generator.
- Install and configure the tool: Install the tool of your choice and follow the instructions to configure it for your website. You may need to enter the URL of your website and other details like the frequency of updates and the priority of pages.
- Generate the sitemap: Once the tool is configured, you can generate the XML sitemap for your website. The tool will crawl your website and create a list of all the pages along with their URLs, meta descriptions, and other information.
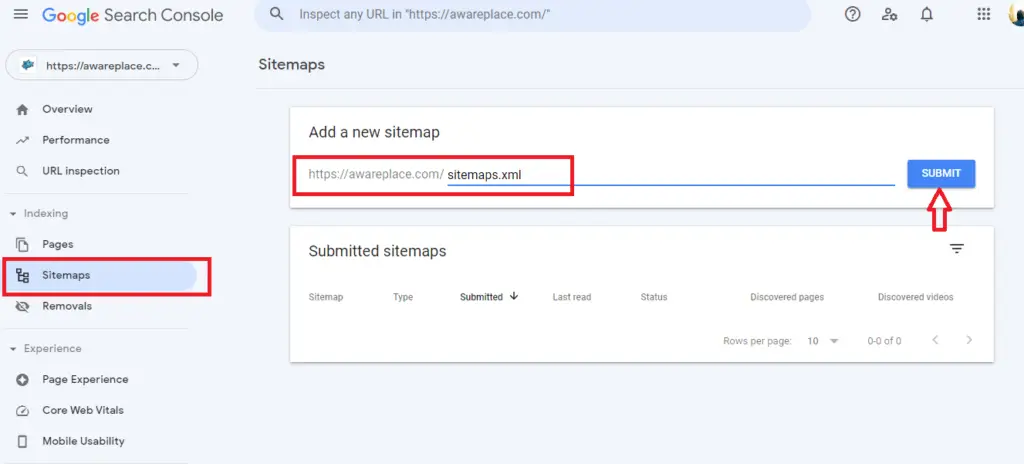
- Submit the sitemap to GSC: Once you have the XML sitemap, you can submit it to Google Search Console (GSC) to ensure that Google crawls and indexes your website more efficiently. In GSC, go to the Sitemaps section and click on “Add a new sitemap.” Enter the URL of your sitemap and click “Submit.” Google will now use this sitemap to crawl your website and show it in search results.
Conclusion
In conclusion, setting up Google Search Console for your website is an essential step to ensure that your site appears in Google search results. By verifying your domain property and submitting an XML sitemap, you can help Google crawl and index your pages more efficiently. It’s also important to regularly monitor your website’s performance through the data provided in GSC and address any errors or issues that may arise. With these tips, you’ll be well on your way to improving your website’s visibility and search engine rankings.


